Springboot Cache사용기[3] Local-Memory-Cache 동작 과정
이전 포스팅에서 SimpleCacheManager를 이용해서 Cache가 동작하는 것을 구현해봤습니다. 그렇다면 이런 CacheManager가 동작되는데 어떠한 과정이 있는지 살펴보기 위해선 먼저 Proxy를 알아야 합니다.
1. Proxy란?
Proxy란 대리자라는 의미를 가지고 있습니다. 예를 들어서 나는 운전면허가 있어서 운전을 할 수 있지만, 누군가에게 대신 운전을 시킬수도 있습니다. 여기서 대신 운전을 해주는 사람이 대리자이며, 영어로 Proxy라고 합니다.
개발자는 10개의 객체에 동일한 기능을 가진 프록시를 적용하려 한다면, 각각의 객체에 대한 부가 기능을 가진 프록시를 모두 정의했어야 했습니다 . 하지만 JDK 동적 프록시와 CGLIB를 이용하면 같은 부가 기능 로직을 한 번만 정의하면 모든 객체에 프록시를 사용할 수 있게 됐습니다. JDK 동적 프록시와 CGLIB를 알아보겠습니다.
1. JDK 동적 프록시
JDK 동적 프록시는 interface를 기반으로 프록시를 생성합니다.
JDK 동적 프록시를 사용하려면 InvocationHandler를 상속받아 구현합니다.
public interface InvocationHandler { public Object invoke(Object proxy, Method method, Object[] args) throws Throwable; }
- proxy: 프록시 자신
- method: 호출할 메서드
- args: 메서드를 호출할 때 넘길 인자
서비스가 실행되고, 끝나기까지 걸리는 시간을 log로 찍어주는 간단한 예제를 만들면서 적용해보겠습니다.
1. interface & 구현체 만들기
간단하게 구현체가 호출되면, 호출됐다는 log를 찍고, 문자열을 반환하는 구현체와 interface를 만들겠습니다.
public interface ServiceA { String execute(); }
@Slf4j //lombok 사용 public class ServiceAImpl implements ServiceA{ @Override public String execute() { log.info("ServiceA 호출"); return "A"; } }
현재의 핵심적인 기능은 서비스의 execute() 입니다. 예시여서 때문에 별거 없지만, 프로젝트나 실무에서 사용한다면 비즈니스 로직이 해당됩니다. 그렇다면 부가적인 기능은 위에서 말했듯이 걸리는 시간을 찍는 log가 해당됩니다. 따라서 부가적인 기능을 handler에 구현하면 됩니다.
2. LogInvocationHandler
@Slf4j public class LogInvocationHandler implements InvocationHandler { private final Object target; public LogInvocationHandler(Object target) { this.target = target; } @Override public Object invoke(Object proxy, Method method, Object[] args) throws Throwable { log.info("LogProxy 실행"); long startTime = System.currentTimeMillis(); Object result = method.invoke(target, args); long endTime = System.currentTimeMillis(); long resultTime = endTime - startTime; log.info("LogProxy 종료 resultTime={}", resultTime); return result; } }
여기서 target은 serviceA입니다. 프록시를 사용하기 위해서 invoke를 구현합니다. 위에서 말했듯이 method는 호출할 메서드입니다.
method.invoke를 통해서 실행될 객체와, 인자를 전달하면 메서드가 실행됩니다. 따라서 method.invoke()는 핵심적인 기능이며, 그 밖에는 부가적인 기능에 해당됩니다. 그렇다면 이제 프록시를 만들어보겠습니다.
3. JDK Proxy Test
@Slf4j public class JDKTest { @Test @DisplayName("JDK 동적 프록시 테스트") void jdkTest(){ ServiceA target = new ServiceAImpl(); LogInvocationHandler handler = new LogInvocationHandler(target); ServiceA proxy = (ServiceA) Proxy.newProxyInstance(ServiceA.class.getClassLoader() , new Class[]{ServiceA.class}, handler); String result = proxy.execute(); // "A" log.info("target: {}", target.getClass()); // ServiceAImpl 구현체 log.info("target: {}", proxy.getClass()); // ServiceAImpl이 아닌 Proxy 객체 } }
1. target인 ServiceA를 만들고, LogInvocation에 주입하여 생성합니다.
2. Proxy.newProxyInstance() 메서드를 통해서 proxy를 생성합니다.
3. proxy.execute()를 실행하면 serviceA가 실행되는 것을 확인할 수 있습니다.
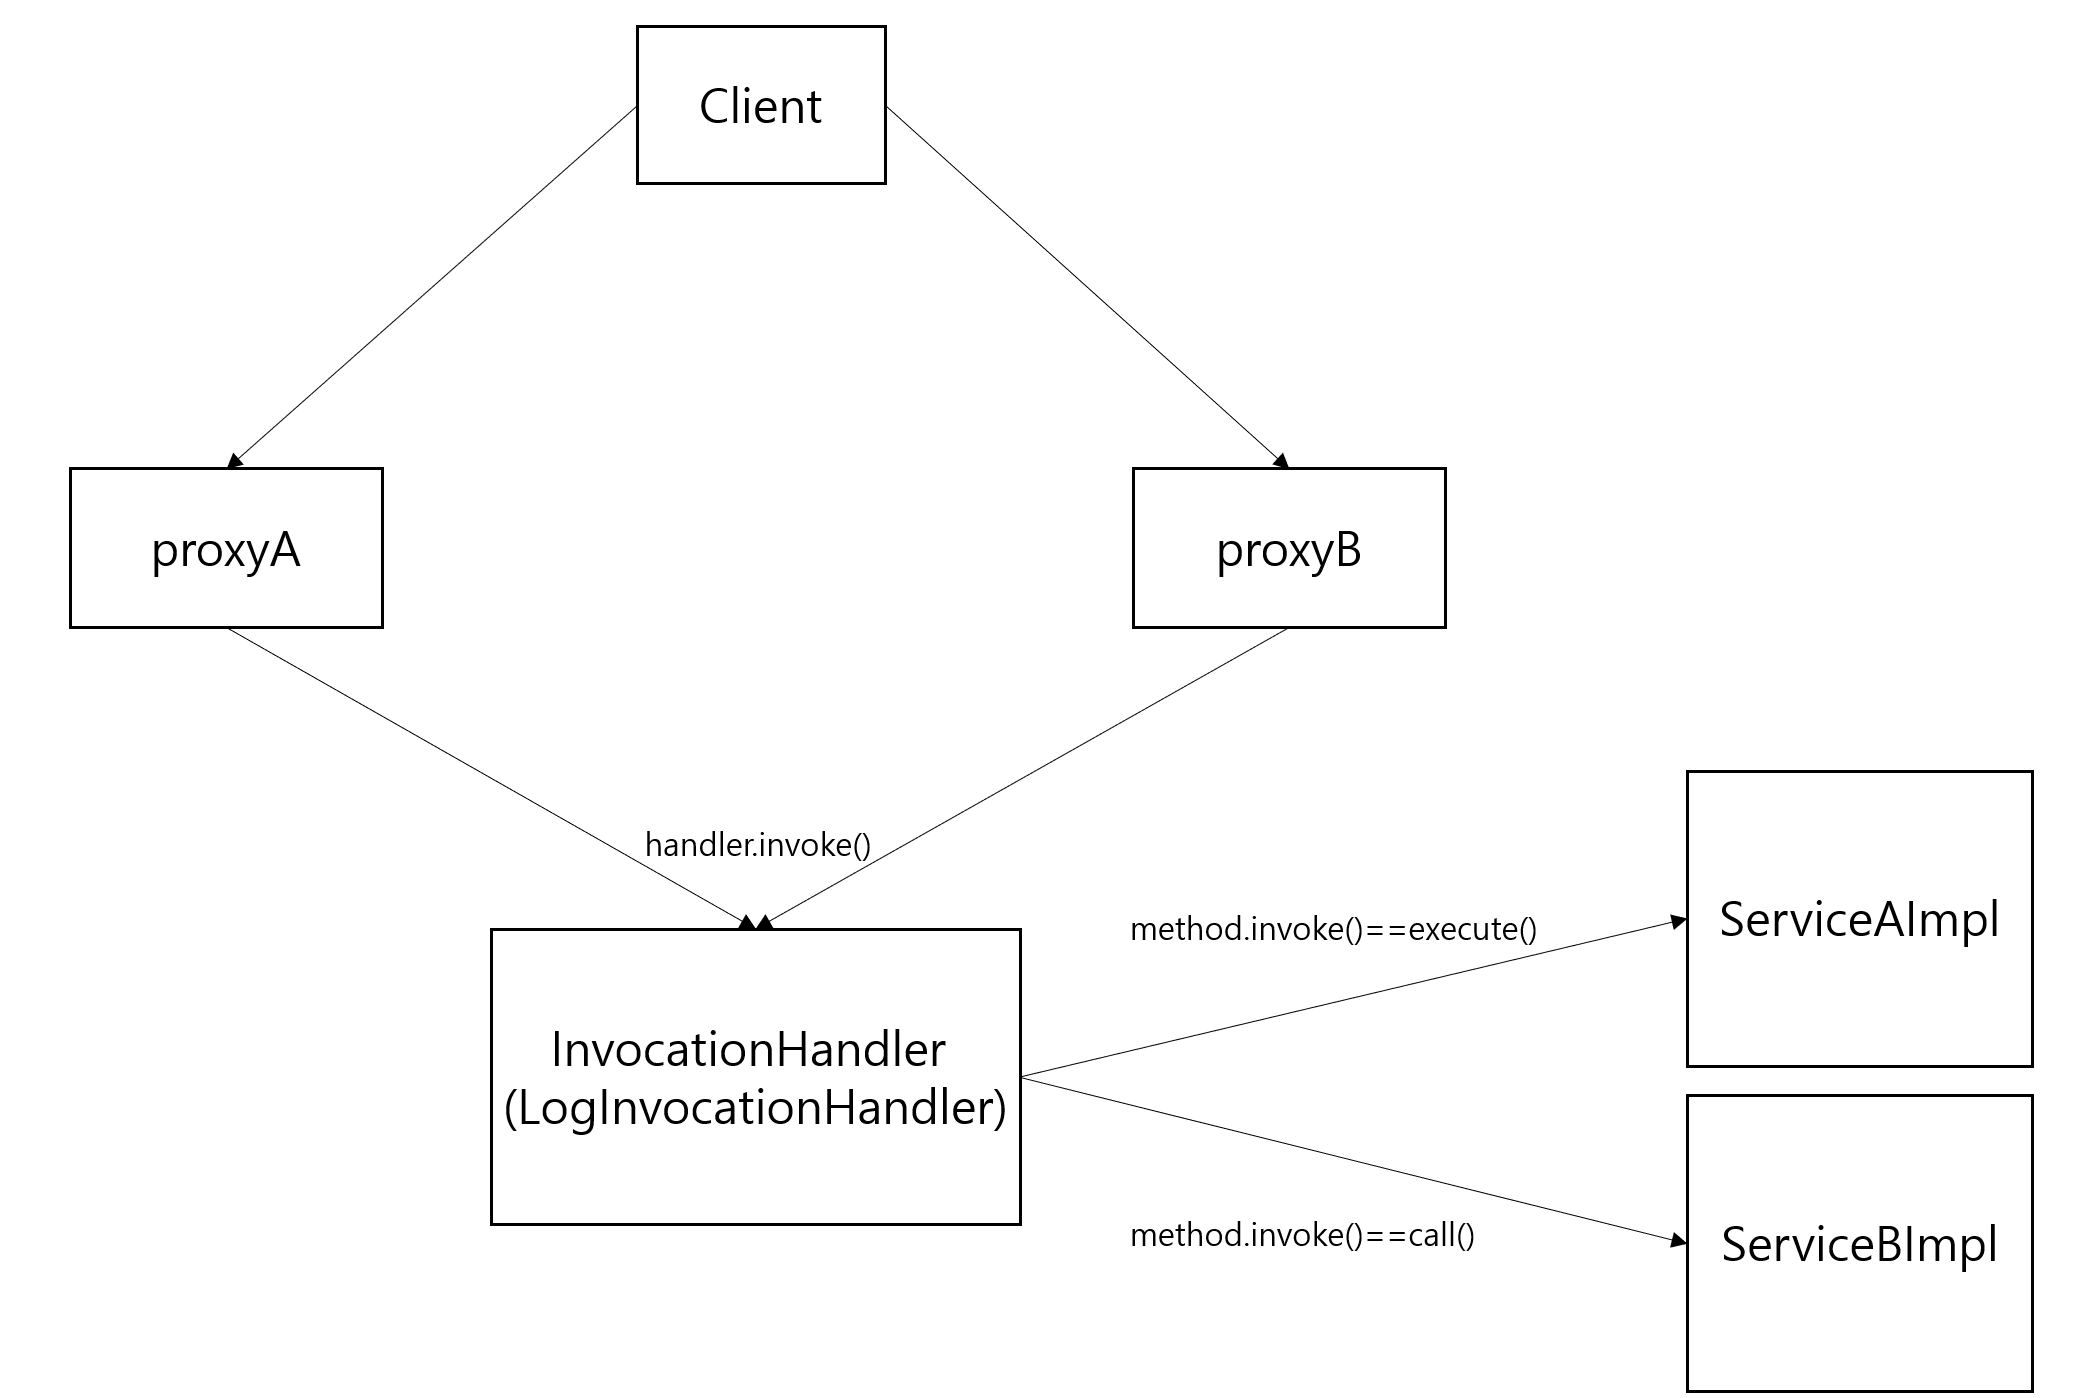
4. JDK 동적 프록시 실행 순서

1. 클라이언트는 JDK 동적 프록시의 execute()를 실행합니다.
2. JDK 동적 프록시는 InvocationHandler.invoke() 를 호출합니다. LogInvocationHandler가 구현체이므로 LogInvocationHandler.invoke() 가 호출됩니다.
3. TimeInvocationHandler 가 내부 로직을 수행하고, method.invoke(target, args) 를 호출해서
target 인 실제 객체( ServiceAImpl )를 호출합니다.
4. ServiceAImpl 인스턴스의 execute()가 실행됩니다.
5. ServiceAImpl 인스턴스의 execute() 의 실행이 끝나면 LogInvocationHandler 로 응답이 돌아옵니다. 시간
로그를 출력하고 결과를 반환합니다.
위에서 말했듯이 "JDK 동적 프록시와 CGLIB를 이용하면 같은 부가 기능 로직을 한 번만 정의하면 모든 객체에 프록시를 사용할 수 있게 됐습니다." 이 부분에 대해서 한 번 보겠습니다.
5. ServiceB & ServiceBImpl
동일한 기능이니 설명은 생략하겠습니다.
public interface ServiceB { String call(); }
@Slf4j public class ServiceBImpl implements ServiceB{ @Override public String call() { log.info("B"); return "B"; } }
6. JDK Proxy Test
@Test @DisplayName("JDK 동적 프록시 테스트2") void jdkTest2() { ServiceA serviceATarget = new ServiceAImpl(); LogInvocationHandler serviceAHandler = new LogInvocationHandler(serviceATarget); ServiceA proxyA = (ServiceA) Proxy.newProxyInstance(ServiceA.class.getClassLoader() , new Class[]{ServiceA.class}, serviceAHandler); String resultA = proxyA.execute(); ServiceA serviceBTarget = new ServiceAImpl(); LogInvocationHandler serviceBHandler = new LogInvocationHandler(serviceBTarget); ServiceB proxy = (ServiceB) Proxy.newProxyInstance(ServiceA.class.getClassLoader() , new Class[]{ServiceA.class}, serviceBHandler); String resultB = proxy.call(); }
LogInvocationHandler는 한 번만 정의하였고, 안에 target이 바뀌면서 JDK 동적 프록시가 적용됩니다. 실행 순서는 똑같지만 그림을 한 번만 살펴보겠습니다.
이처럼 개발자는 결과적으로 프록시 클래스를 수 없이 만들어야 하는 문제도 해결하고, 부가 기능 로직도 하나의 클래스에 모아서 단일 책임 원칙(SRP)도 지킬 수 있게 됐습니다.
2. CGLIB
- CGLIB는 바이트코드를 조작해서 동적으로 클래스를 생성하는 기술을 제공하는 라이브러리입니다.
- CGLIB를 사용하면 인터페이스가 없어도 구체 클래스만 가지고 동적 프록시를 만들어낼 수 있습니다.
- CGLIB는 원래는 외부 라이브러리이지만, 스프링 프레임워크가 스프링 내부 소스 코드에 포함됐기 때문에 스프링을 사용한다면 별도의 외부 라이브러리를 추가하지 않아도 사용할 수 있습니다.
CGLIB를 사용하려면 MethodInterceptor를 상속받아 구현합니다.
public interface MethodInterceptor extends Callback { Object intercept(Object obj, Method method, Object[] args, MethodProxy proxy) throws Throwable; }
obj : CGLIB가 적용된 객체
method : 호출된 메서드
args : 메서드를 호출하면서 전달된 인수
proxy : 메서드 호출에 사용
JDK 동적 프록시와 동일하게 서비스가 실행되고, 끝나기 까지 걸리는 시간 log를 찍어주는 간단한 예제를 만들면서 적용해보겠습니다. 중복되는 설명은 생략하겠습니다.
1. ServiceImpl
@Slf4j public class ServiceImpl { public String execute(){ log.info("ServiceImpl"); return "ServiceImpl"; } }
2. LogMethodInterceptor
@Slf4j public class LogMethodInterceptor implements MethodInterceptor { private final Object target; public LogMethodInterceptor(Object target) { this.target = target; } @Override public Object intercept(Object o, Method method, Object[] objects, MethodProxy methodProxy) throws Throwable { log.info("LogProxy 실행"); long startTime = System.currentTimeMillis(); Object result = method.invoke(target, objects); long endTime = System.currentTimeMillis(); long resultTime = endTime - startTime; log.info("LogProxy 종료 resultTime={}", resultTime); return result; } }
동일하게 method.invoke()를 사용합니다.
@Test @DisplayName("cglib Test") void cglibTest(){ ServiceImpl target = new ServiceImpl(); Enhancer enhancer = new Enhancer(); enhancer.setSuperclass(ServiceImpl.class); enhancer.setCallback(new LogMethodInterceptor(target)); ServiceImpl proxy = (ServiceImpl) enhancer.create(); proxy.execute(); }
1. Enhancer 객체를 사용해서 Proxy를 생성합니다.
2. setSuperclass: 상속받을 구체 클래스를 선택합니다.
3. setCallback: 프록시에 적용할 실행 로직을 넣어줍니다.
마찬가지로 그림으로 보겠습니다.
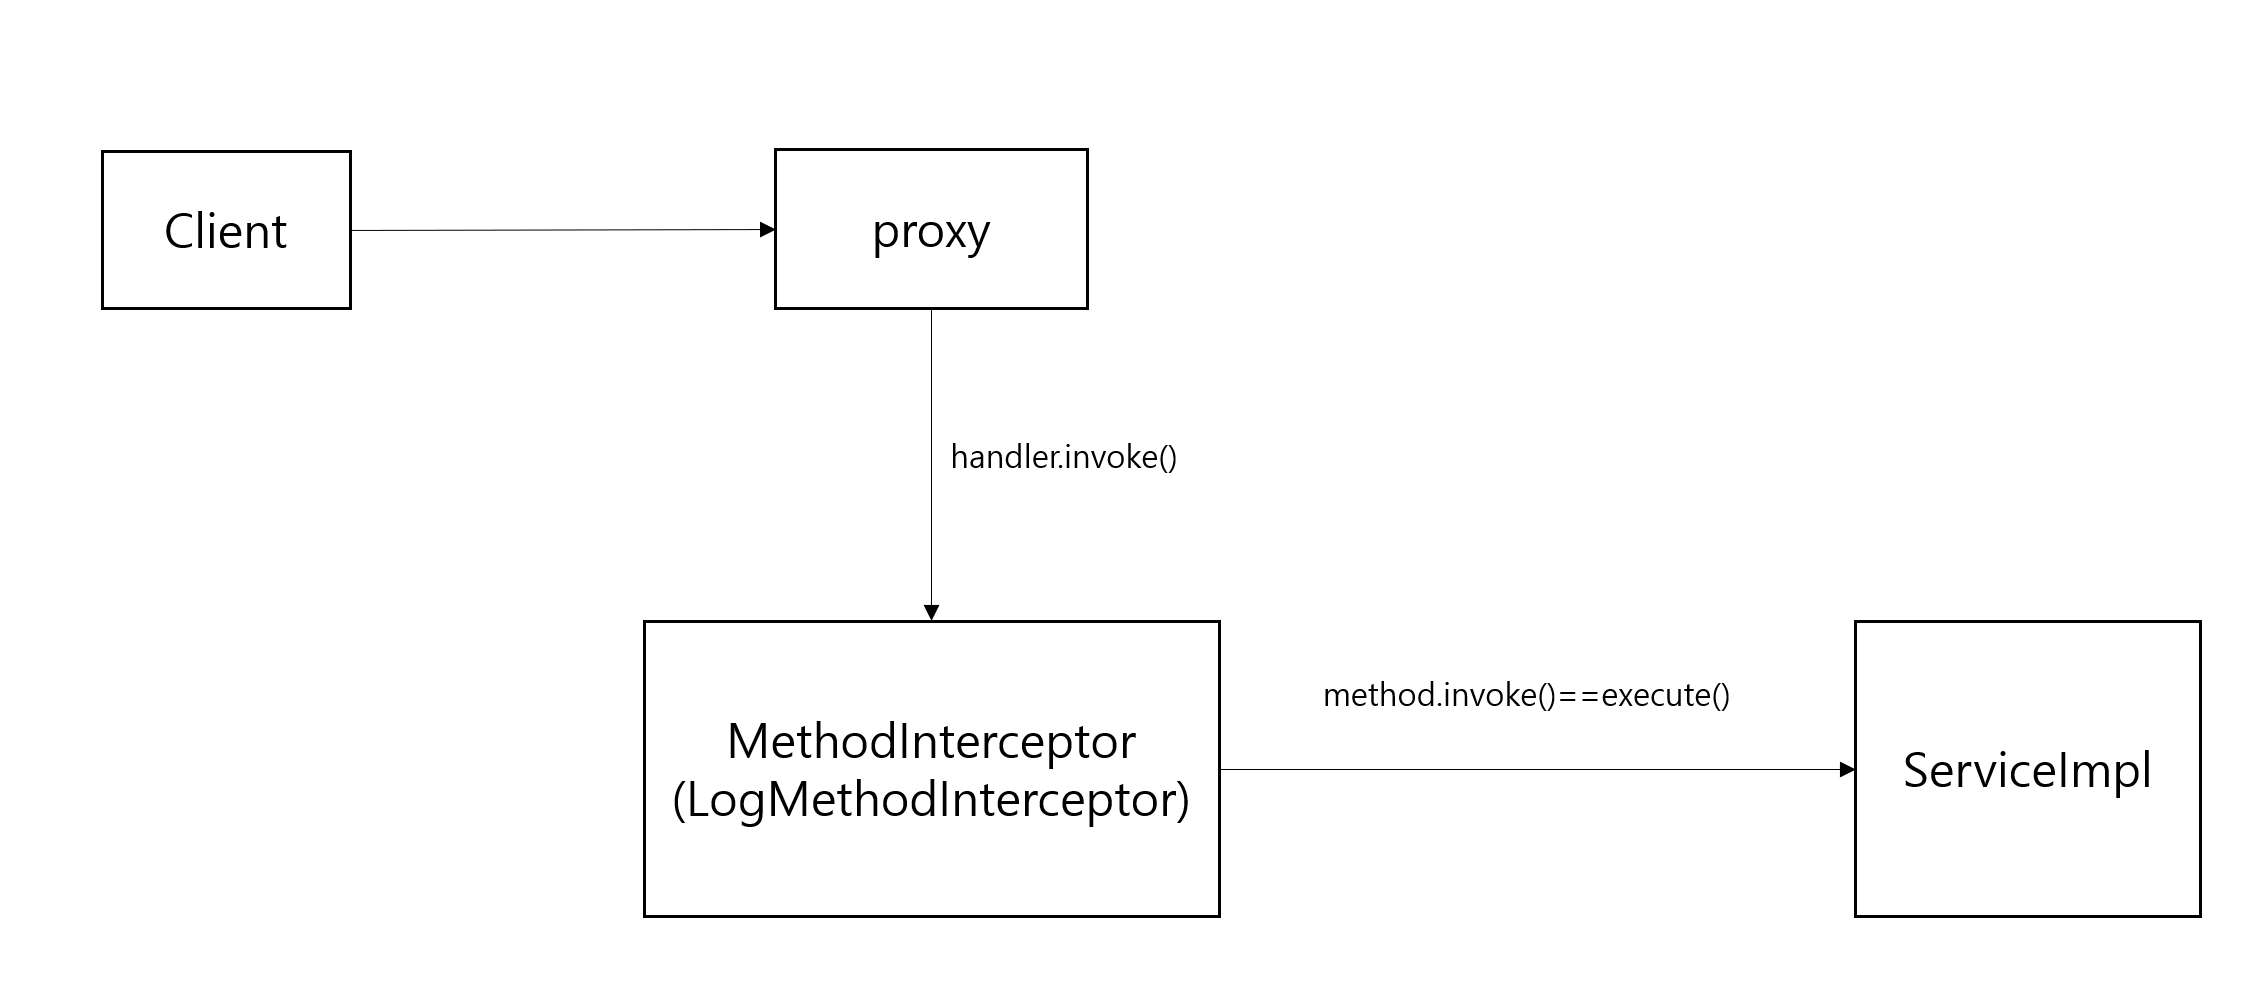
JDK 동적 프록시와 동일한 방식으로 동작합니다.
지금까지 Proxy가 무엇인지 어떻게 동작하는지 알아봤습니다. 알아본 이유는 Cache도 Proxy로 동작하기 때문입니다. 살펴보겠습니다.
1. CacheInterceptor
위에서 보았던 프록시 기술이 적용됩니다. Spring에서 프록시를 지원해주는 aoplliance의 MethodInterceptor를 상속받아 구현돼있습니다.
public class CacheInterceptor extends CacheAspectSupport implements MethodInterceptor, Serializable { @Override @Nullable public Object invoke(final MethodInvocation invocation) throws Throwable { Method method = invocation.getMethod(); CacheOperationInvoker aopAllianceInvoker = () -> { try { return invocation.proceed(); } catch (Throwable ex) { throw new CacheOperationInvoker.ThrowableWrapper(ex); } }; Object target = invocation.getThis(); Assert.state(target != null, "Target must not be null"); try { return execute(aopAllianceInvoker, target, method, invocation.getArguments()); } catch (CacheOperationInvoker.ThrowableWrapper th) { throw th.getOriginal(); } } }
위에서 봤던 Proxy로직들 유사합니다. 여기서는 execute()를 실행하고, 반환합니다.
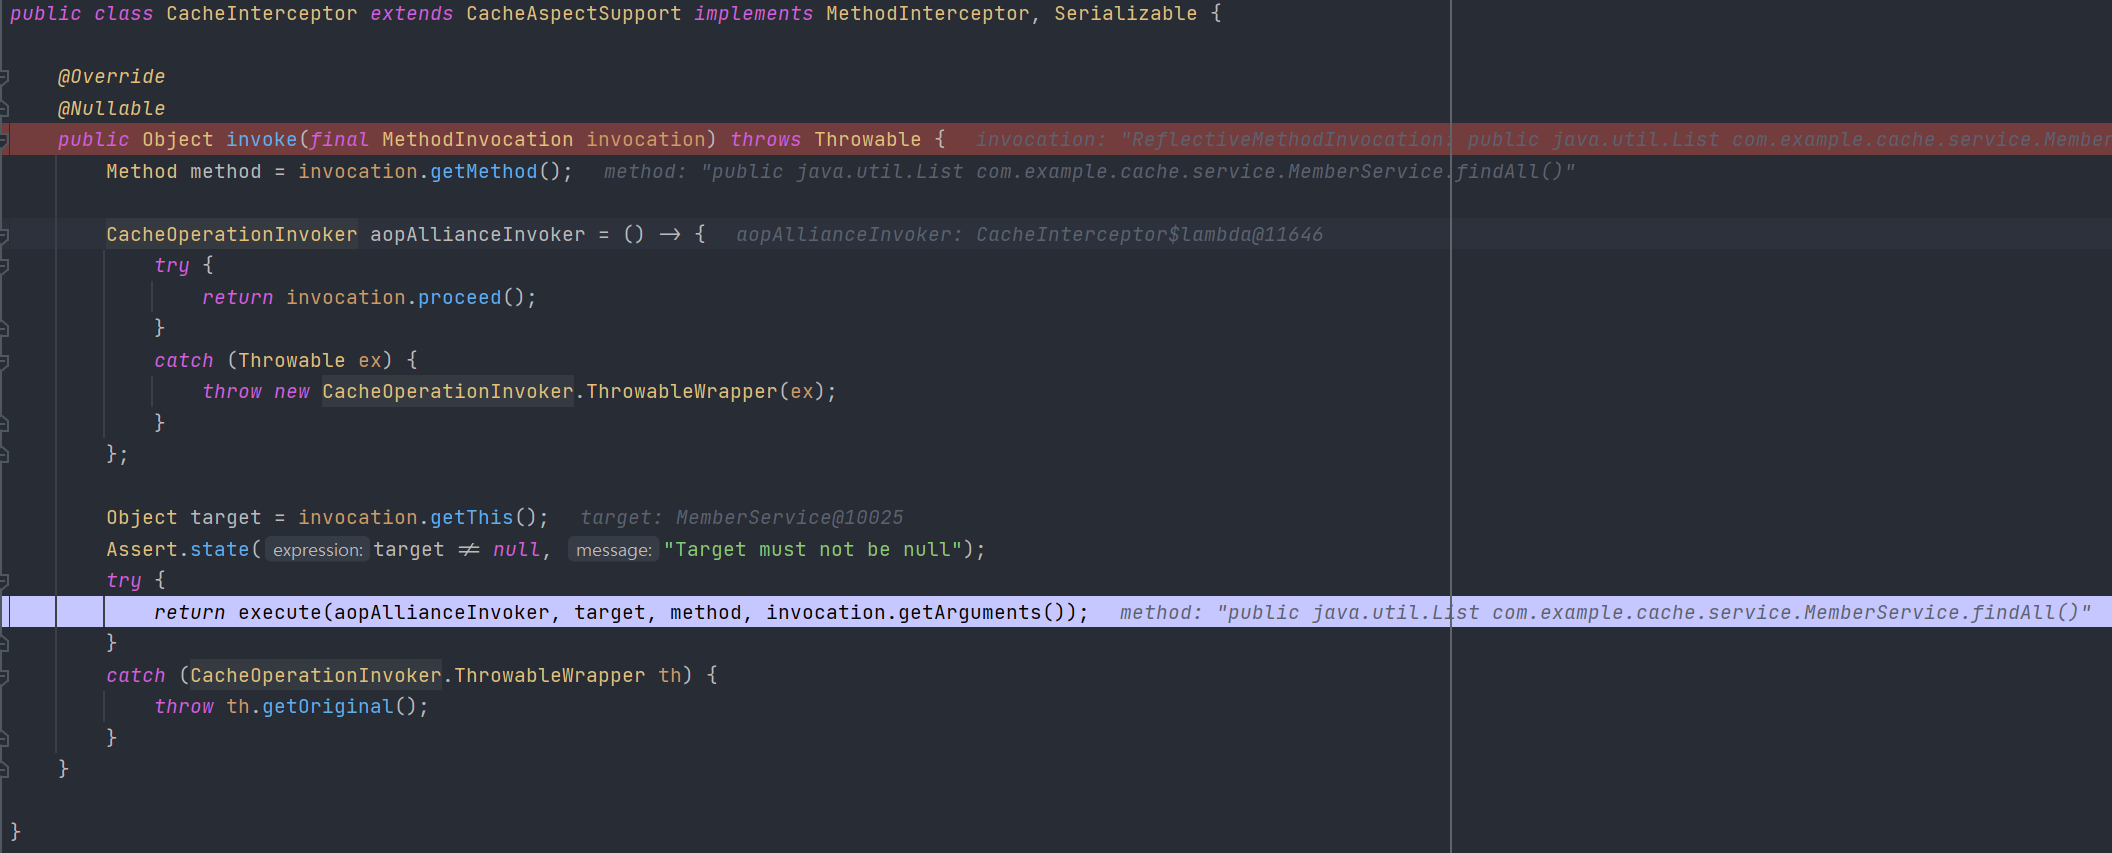
멤버의 전체 리스트를 받는 로직을 디버깅했을 때 MemberService.findAll()을 넘겨주는 것을 확인할 수 있습니다. execute()는 CacheAspectSupport의 메서드입니다.
2. CacheAspectSupport
CacheIntercepor와 함께 Cache에서 프록시 기술을 사용할 수 있도록 해주는 추상클래스입니다. CacheInterceptor에서호출한 execute() 메서드를 보겠습니다.
@Nullable protected Object execute(CacheOperationInvoker invoker, Object target, Method method, Object[] args) { // Check whether aspect is enabled (to cope with cases where the AJ is pulled in automatically) if (this.initialized) { Class<?> targetClass = getTargetClass(target); CacheOperationSource cacheOperationSource = getCacheOperationSource(); if (cacheOperationSource != null) { Collection<CacheOperation> operations = cacheOperationSource.getCacheOperations(method, targetClass); if (!CollectionUtils.isEmpty(operations)) { return execute(invoker, method, new CacheOperationContexts(operations, method, args, target, targetClass)); } } } return invoker.invoke(); }
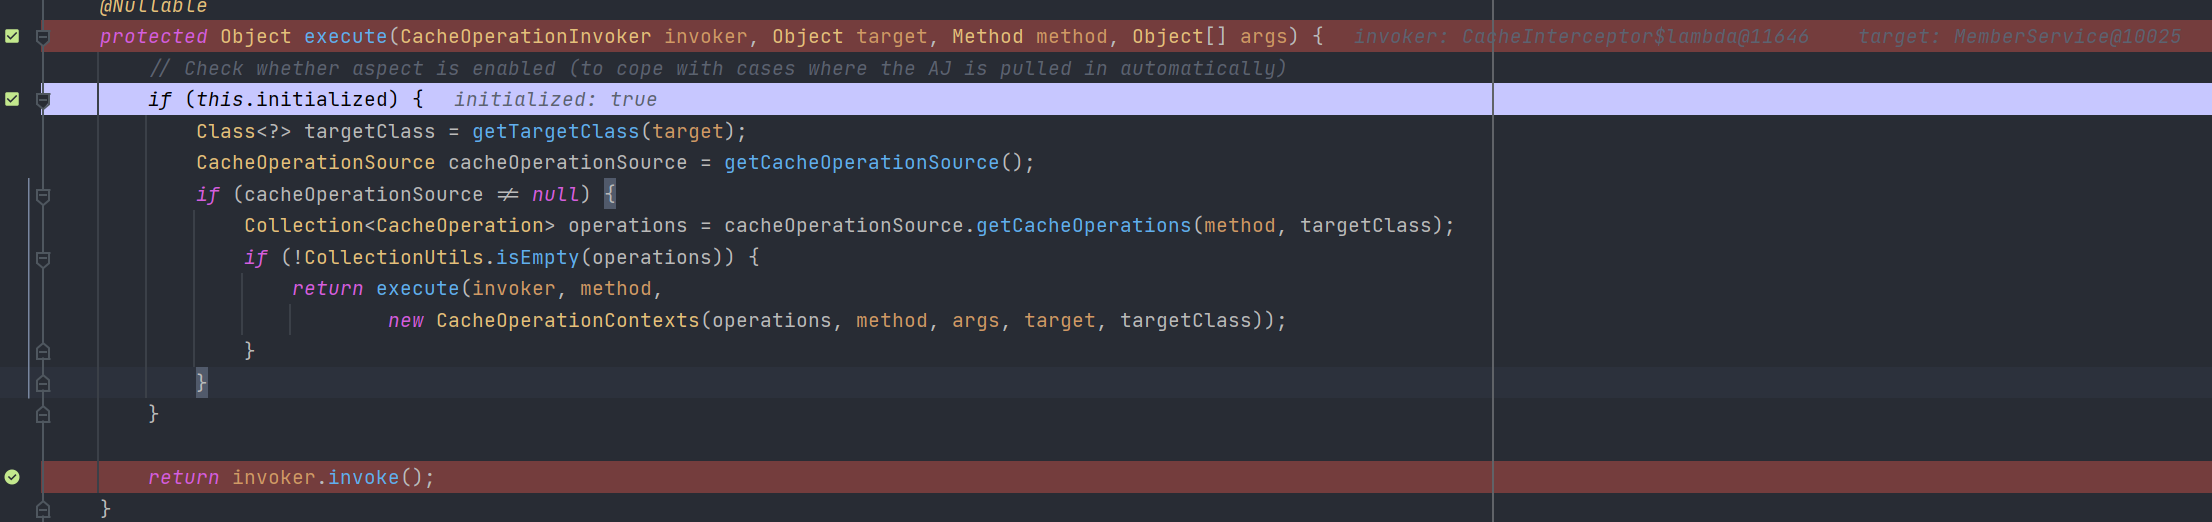
여기서 if(this.initailized)의 initiailized는 Cache Proxy가 Bean으로 등록될 때 true로 초기화됩니다. 따라서 if문쪽 안에 있는 execute() 실행을 준비합니다. 준비는 cache에 대한 이름을 찾는 것입니다. getCaches()메서드가 동작해서 Cache에 대한 정보를 찾습니다.

여기서 cacheResolver가 동작하게 됩니다.
2-1. AbtractCacheResolver (우리는 SimpleCacheResolver가 구현체입니다.)
ArgumentResolver에 관한 설명은 생략하겠습니다.
@Override public Collection<? extends Cache> resolveCaches(CacheOperationInvocationContext<?> context) { Collection<String> cacheNames = getCacheNames(context); if (cacheNames == null) { return Collections.emptyList(); } Collection<Cache> result = new ArrayList<>(cacheNames.size()); for (String cacheName : cacheNames) { Cache cache = getCacheManager().getCache(cacheName); if (cache == null) { throw new IllegalArgumentException("Cannot find cache named '" + cacheName + "' for " + context.getOperation()); } result.add(cache); } return result; }
이 메서드는 CacheAspectSupport의 getCaches에 의해서 호출됩니다. 위에서 말했듯이 CacheManager를 통해서 Cache를 조회하고, 없다면 예외, 있다면 반환을 합니다.
2-2. AbstractCacheManager
Cache에 대한 추가, 조회등을 담당합니다.
AbstractCacheManager의 getCache()를 살펴보겠습니다.
@Override @Nullable public Cache getCache(String name) { // Quick check for existing cache... Cache cache = this.cacheMap.get(name); if (cache != null) { return cache; } // The provider may support on-demand cache creation... Cache missingCache = getMissingCache(name); if (missingCache != null) { // Fully synchronize now for missing cache registration synchronized (this.cacheMap) { cache = this.cacheMap.get(name); if (cache == null) { cache = decorateCache(missingCache); this.cacheMap.put(name, cache); updateCacheNames(name); } } } return cache; }
등록된 Cache인지 확인하고, 있다면 반환합니다.
2-3 반환된 캐시를 가지고 CacheAspectSupport로 돌아오게 됩니다.
그 후 private로 선언된 execute를 실행합니다.
private Object execute(final CacheOperationInvoker invoker, Method method, CacheOperationContexts contexts) { // Special handling of synchronized invocation if (contexts.isSynchronized()) { CacheOperationContext context = contexts.get(CacheableOperation.class).iterator().next(); if (isConditionPassing(context, CacheOperationExpressionEvaluator.NO_RESULT)) { Object key = generateKey(context, CacheOperationExpressionEvaluator.NO_RESULT); Cache cache = context.getCaches().iterator().next(); try { return wrapCacheValue(method, handleSynchronizedGet(invoker, key, cache)); } catch (Cache.ValueRetrievalException ex) { // Directly propagate ThrowableWrapper from the invoker, // or potentially also an IllegalArgumentException etc. ReflectionUtils.rethrowRuntimeException(ex.getCause()); } } else { // No caching required, only call the underlying method return invokeOperation(invoker); } } // Process any early evictions processCacheEvicts(contexts.get(CacheEvictOperation.class), true, CacheOperationExpressionEvaluator.NO_RESULT); // Check if we have a cached item matching the conditions Cache.ValueWrapper cacheHit = findCachedItem(contexts.get(CacheableOperation.class)); // Collect puts from any @Cacheable miss, if no cached item is found List<CachePutRequest> cachePutRequests = new ArrayList<>(); if (cacheHit == null) { collectPutRequests(contexts.get(CacheableOperation.class), CacheOperationExpressionEvaluator.NO_RESULT, cachePutRequests); } Object cacheValue; Object returnValue; if (cacheHit != null && !hasCachePut(contexts)) { // If there are no put requests, just use the cache hit cacheValue = cacheHit.get(); returnValue = wrapCacheValue(method, cacheValue); } else { // Invoke the method if we don't have a cache hit returnValue = invokeOperation(invoker); cacheValue = unwrapReturnValue(returnValue); } // Collect any explicit @CachePuts collectPutRequests(contexts.get(CachePutOperation.class), cacheValue, cachePutRequests); // Process any collected put requests, either from @CachePut or a @Cacheable miss for (CachePutRequest cachePutRequest : cachePutRequests) { cachePutRequest.apply(cacheValue); } // Process any late evictions processCacheEvicts(contexts.get(CacheEvictOperation.class), false, cacheValue); return returnValue; }
여기서 cacheHit를 볼 필요가 있습니다.
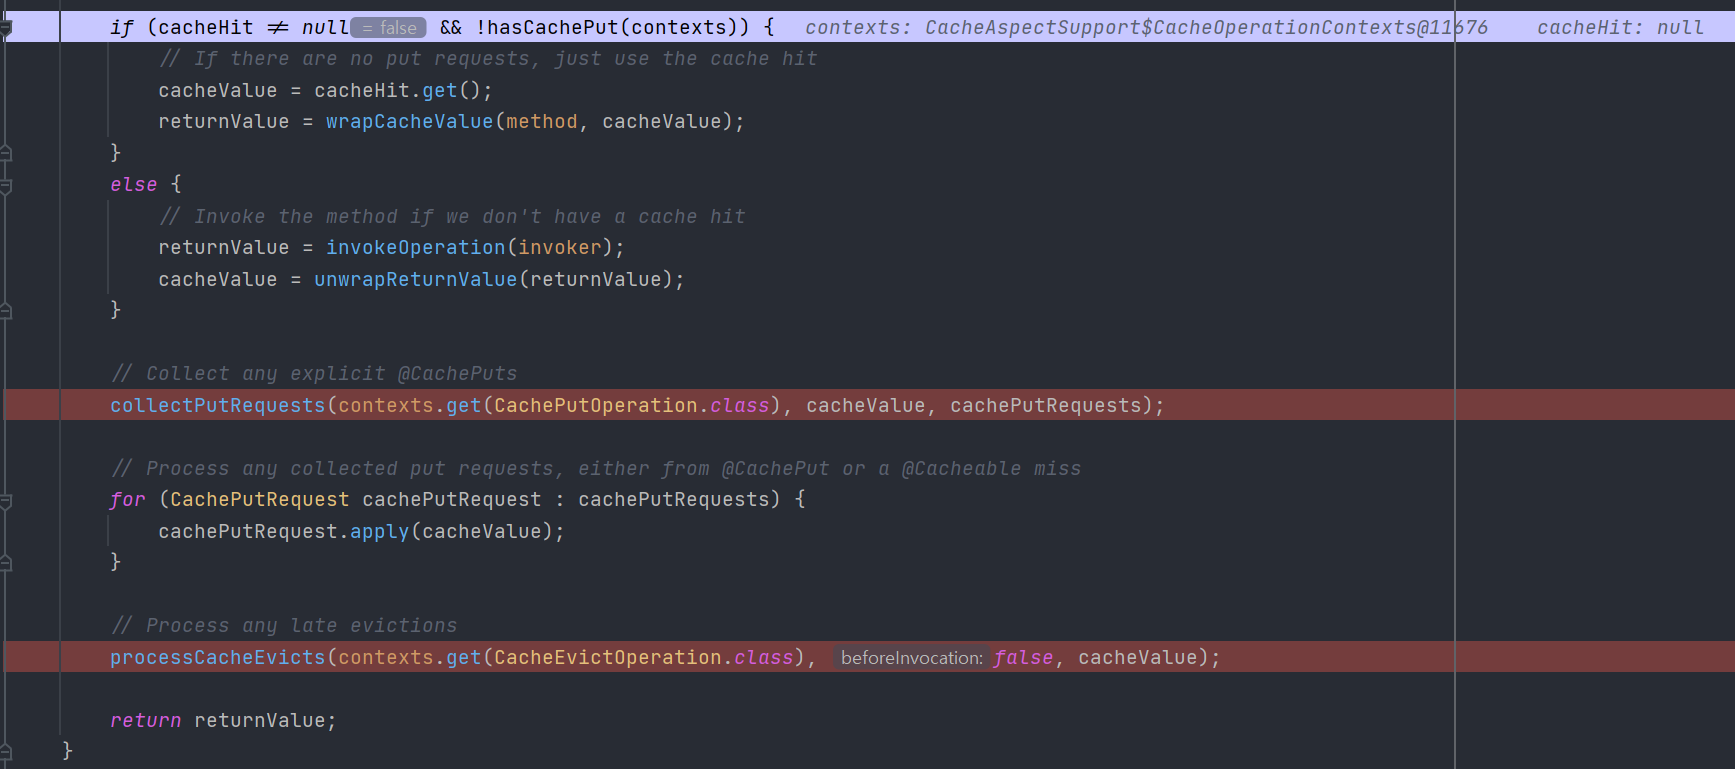
CacheHit!=null: 메서드를 실행하지 않고, 바로 값을 반환합니다.
CacheHit==null: 메서드를 실행한다.
따라서 이 부분이 캐시를 이용해서 성능 개선이 되는 것을 확인할 수 있는 부분입니다. 이 값들이 클라이언트에게 전달됩니다.
조회는 이렇게 마무리되며, CachePut,CacheEvict에 대한 동작들도 CacheAspectSupport의 private execute()안에 있는 로직들이 동작하며 이뤄지게 됩니다.
정리하기
프록시를 사용할 수 있게 해주는 기술들에 대해서 알아봤습니다.
-JDK 동적 프록시(인터페이스를 기반으로 프록시 생성)
-CGLIB(구체 클래스를 기반으로 프록시 생성)
Cache 동작과정
1. CacheInterceptor: MethodInterceptor를 상속받아 프록시 기술을 이용하는 클래스
2. CacheAspectSupprot: CacheIntercepor와 함께 Cache에서 프록시 기술을 사용할 수 있도록 해주는 추상클래스
3. AbstractCacheResolver: Cache값을 넘겨주기 위한 ArgumentResovler 역할
4. AbstractCacheManager: Cache를 조회하고 반환하는 역할
순서도

잘못된 부분이 있다면 댓글 부탁드립니다. 다음은 Redish를 이용해서 Cache를 적용해보겠습니다. 읽어주셔서 감사합니다.
'SpringBoot > cache' 카테고리의 다른 글
| Springboot Cache 사용기[5] Redis 이용한 Cache 사용 (0) | 2022.04.16 |
|---|---|
| Springboot Cache 사용기[4] Redis 사용하기 (0) | 2022.04.10 |
| Springboot Cache 사용기[2] Local-Memory-Cache (2) | 2022.03.30 |
| Springboot Cache 사용기[1] (0) | 2022.03.30 |
댓글을 사용할 수 없습니다.