SpringBoot [스프링부트] Spring Security Oauth2 (6) Google Token 활용
이전에는 google에 인증을 마치면 Session을 생성해서 사용자의 인증과 인가를 처리했습니다. 이번에는 google이 제공하는 API인 Access Code와 Access Token으로 서버의 JWT 토큰을 발급하여 인증과 인가를 처리해보겠습니다. 진행하면서 삽질을 많이 했는데 그 부분에 대해서도 작성하겠습니다.
간단한 순서도를 보겠습니다.

1. 사용자가 로그인 요청
2. 서버는 Google API Server의 로그인을 하는 URI로 리디렉션
3. 로그인 성공 시 설정한 redirect-uri로 리디렉션 진행하며, Access Token을 발급받을 수 있는 Authorization code를 쿼리 파라미터 넘겨줌
4. Authorization code를 활용해서 Access Token 발급 요청
5. Access Token 발급 후 Authorization code 앞으로 사용불가
6. Access Token으로 사용자 정보 요청
7. 사용자 정보 반환
8. 사용자 정보를 기반으로 사용자가 인가에 사용할 JWT 토큰 발급
순서도는 알아봤고 이제 설정하고, 코드를 작성해보겠습니다.
1. Google cloud Platform 설정
이전에 사용자 인증 정보와 동의 화면을 구성했었습니다. 사용자 인증 정보에 추가로 승인된 리디렉션 URI를 추가하겠습니다.
총 2가지의 리디렉션 URI를 추가합니다.
총 두가지의 URI를 추가했습니다.
1. 실제로 요청하고 인증이 완료됐을 때 서버로 리디렉션 하는 URI입니다.
2. 토큰이 잘 발급되는지 확인하기위해 Postman으로 확인하는 URI입니다.
http://localhost:8080/app/accounts/auth/google/redirect https://getpostman.com/oauth2/callback
2. Postman 토큰 발급 테스트
위에서 설정은 끝났고, Postman 리디렉션 URI로 토큰이 들어오는지 확인하겠습니다.
1. Token Name -> 말 그대로 들어오는 Token의 이름 설정
2. Callback URL -> 위에서 설정한 리디렉션 URL을 넣어주시면 되고, 해당 주소로 리디렉션 됩니다.
3. Auth URL -> 인증을 진행하는 URL입니다. 해당 주소는 Google API에서 확인할 수 있습니다.
4. AccessToken URL -> 로직에서 봤듯이 인증을 한 후에는 한 번 사용할 수 있는 code를 얻고 해당 코드로 Access Token을 받습니다.
5. Client ID, Client Secret -> Google Cloud Platform에서 생성한 프로젝트의 Id와 Secret입니다. 노출되면 안 됩니다.
6. Scope -> Token으로 사용자의 정보를 받아올 때 어떠한 정보를 받아올지에 대한 Scope입니다.
2-1. Postman 실행하기
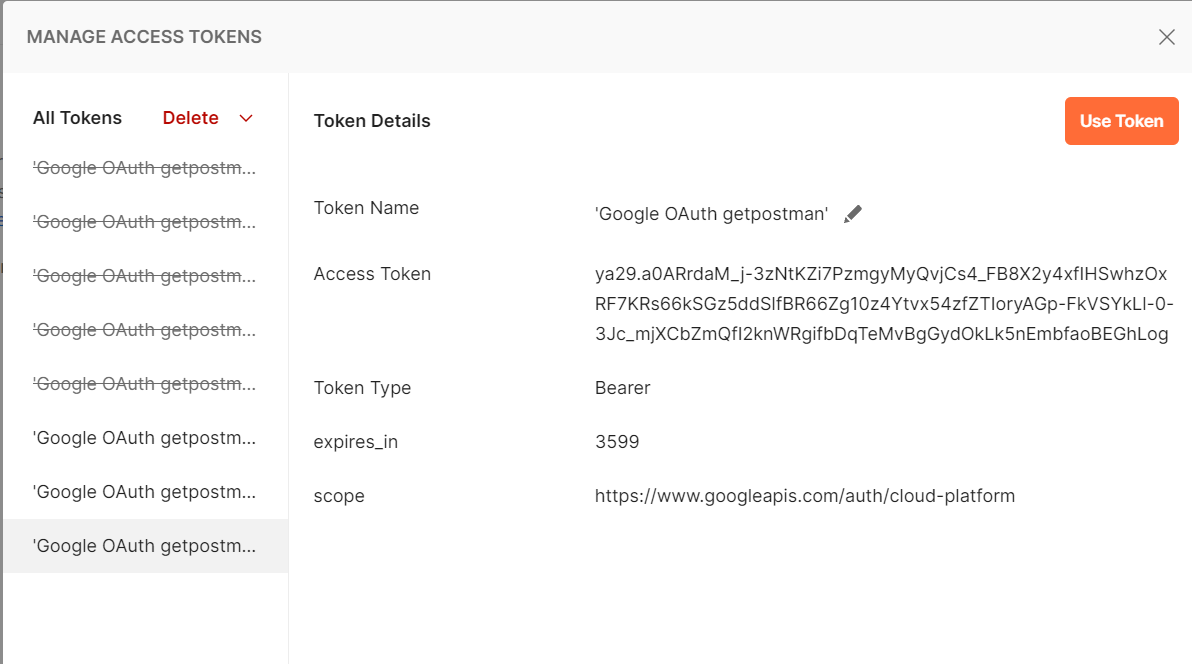
설정이 끝났으므로 가장 밑에 Get Access Token을 눌러줍니다.
정상적으로 Access Token이 발급된 것을 확인할 수 있습니다.
3. OauthController - 1
총 2가지의 핸들러를 만들어야 합니다.
1. 요청을 Google 로그인을 할 수 있도록 리디렉션 해주는 핸들러
2. 인증이 성공한 후 Access Token 발급 및 사용을 위한 핸들러
@RestController @RequiredArgsConstructor @RequestMapping("/app/accounts") public class OauthController { private final OauthService oauthService; // 로그인 인증을 할 수 있도록 리디렉션 해주는 핸들러 @GetMapping("/auth/{type}") public void socialLoginRequest(@PathVariable("type")String type, HttpServletResponse response) throws IOException { String requestURL = oauthService.request(type.toUpperCase()); response.sendRedirect(requestURL); } }
4. Springboot Yaml 설정
이전에 사용했던 설정이 필요는 없지만, 이전 예제를 바꾸지 않기 위해 아래와 같이 Yaml을 작성해줍니다. 여기서 굉장히 삽질한 내용은 scope였습니다. scope는 받을 정보인데 저는 email과 profile에 대한 설정을 받으려고 처음에 ' '(공백)을 넣고 했지만 계속해서 email만 넘어왔습니다. 찾아본 결과 ' '이 인코딩 과정에서 문제가 발생했기 때문입니다. 따라서 '%20'으로 넣어주셔야 합니다.
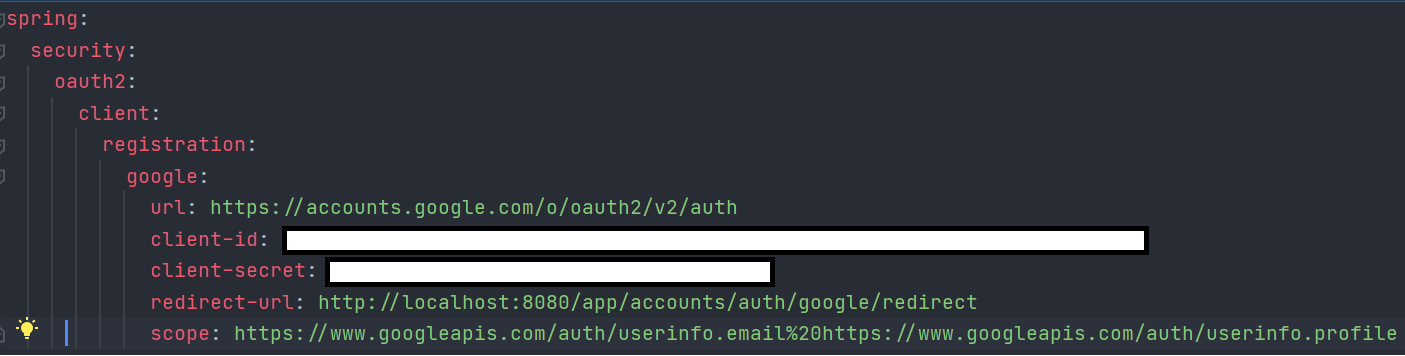
복붙용
spring: security: oauth2: client: registration: google: url: https://accounts.google.com/o/oauth2/v2/auth client-id: client-secret: redirect-url: http://localhost:8080/app/accounts/auth/google/redirect scope: https://www.googleapis.com/auth/userinfo.email%20https://www.googleapis.com/auth/userinfo.profile
5. OauthService - 1
실질적으로 Oauth의 요청을 만들고, Goolge API와 통신하도록 하는 Servie 계층입니다.
@Service @RequiredArgsConstructor public class OauthService { private final SocialOauth socialOauth; public String request(String type) throws IOException { String redirectURL; redirectURL=socialOauth.getOauthRedirectURL(); return redirectURL; } public GetSocialOAuthRes oAuthLogin(String code) throws JsonProcessingException { ResponseEntity<String> accessToken =socialOauth.requestAccessToken(code); GoogleOAuthToken googleOAuthToken =socialOauth.getAccessToken(accessToken); ResponseEntity<String> userInfoResponse=socialOauth.requestUserInfo(googleOAuthToken); GoogleUser googleUser =socialOauth.getUserInfo(userInfoResponse); String user_id = googleUser.getEmail(); return new GetSocialOAuthRes("1234",1,"asdf", googleOAuthToken.getToken_type()); } }
1. request(): 리디렉션 할 URI을 만드는 메서드
2. oAuthLogin(): 인증 성공 후 해당 code로 Access Token을 얻고 Access Token으로 사용자의 정보를 얻어오는 메서드
6. SocialOauth - 1
Google, Naver, Kakao 등등 여러 가지 Oauth가 있으므로 인터페이스를 만들어 상속받고, 해당 구현체들을 구현합니다. 일단 Google만 만들 예정이므로 GoogleOauth만 만들겠습니다.
public interface SocialOauth { String getOauthRedirectURL(); ResponseEntity<String> requestAccessToken(String code); GoogleOAuthToken getAccessToken(ResponseEntity<String> accessToken) throws JsonProcessingException; ResponseEntity<String> requestUserInfo(GoogleOAuthToken googleOAuthToken); GoogleUser getUserInfo(ResponseEntity<String> userInfoResponse) throws JsonProcessingException; }
6-1. Google Oauth 작성
리디렉션 URI을 생성하고, Google API를 이용할 GoogleOauth입니다. 설명은 메서드마다 하나씩 설명하겠습니다.
@Component @RequiredArgsConstructor public class GoogleOauth implements SocialOauth{ @Value("${spring.security.oauth2.client.registration.google.url}") private String GOOGLE_SNS_LOGIN_URL; @Value("${spring.security.oauth2.client.registration.google.client-id}") private String GOOGLE_SNS_CLIENT_ID; @Value("${spring.security.oauth2.client.registration.google.redirect-url}") private String GOOGLE_SNS_CALLBACK_URL; @Value("${spring.security.oauth2.client.registration.google.client-secret}") private String GOOGLE_SNS_CLIENT_SECRET; @Value("${spring.security.oauth2.client.registration.google.scope}") private String GOOGLE_DATA_ACCESS_SCOPE; // Stirng 값을 객체로 바꾸는 Mapper private final ObjectMapper objectMapper; // Google API로 요청을 보내고 받을 객체입니다. private final RestTemplate restTemplate; }
먼저 메서드를 확인하기 전에 Google API를 확인해보겠습니다. 앤드포인트를 설정함으로써 사용자가 Google 로그인을 할 수 있도록 만들어줍니다. 또한 redirect_uri를 저희가 리디렉션 URI로 설정해서 인증이 성공하면 저희의 핸들러로 넘어오게 설정해줍니다. 필수라고 적혀 있는 것들은 모두 채워주셔야 합니다.
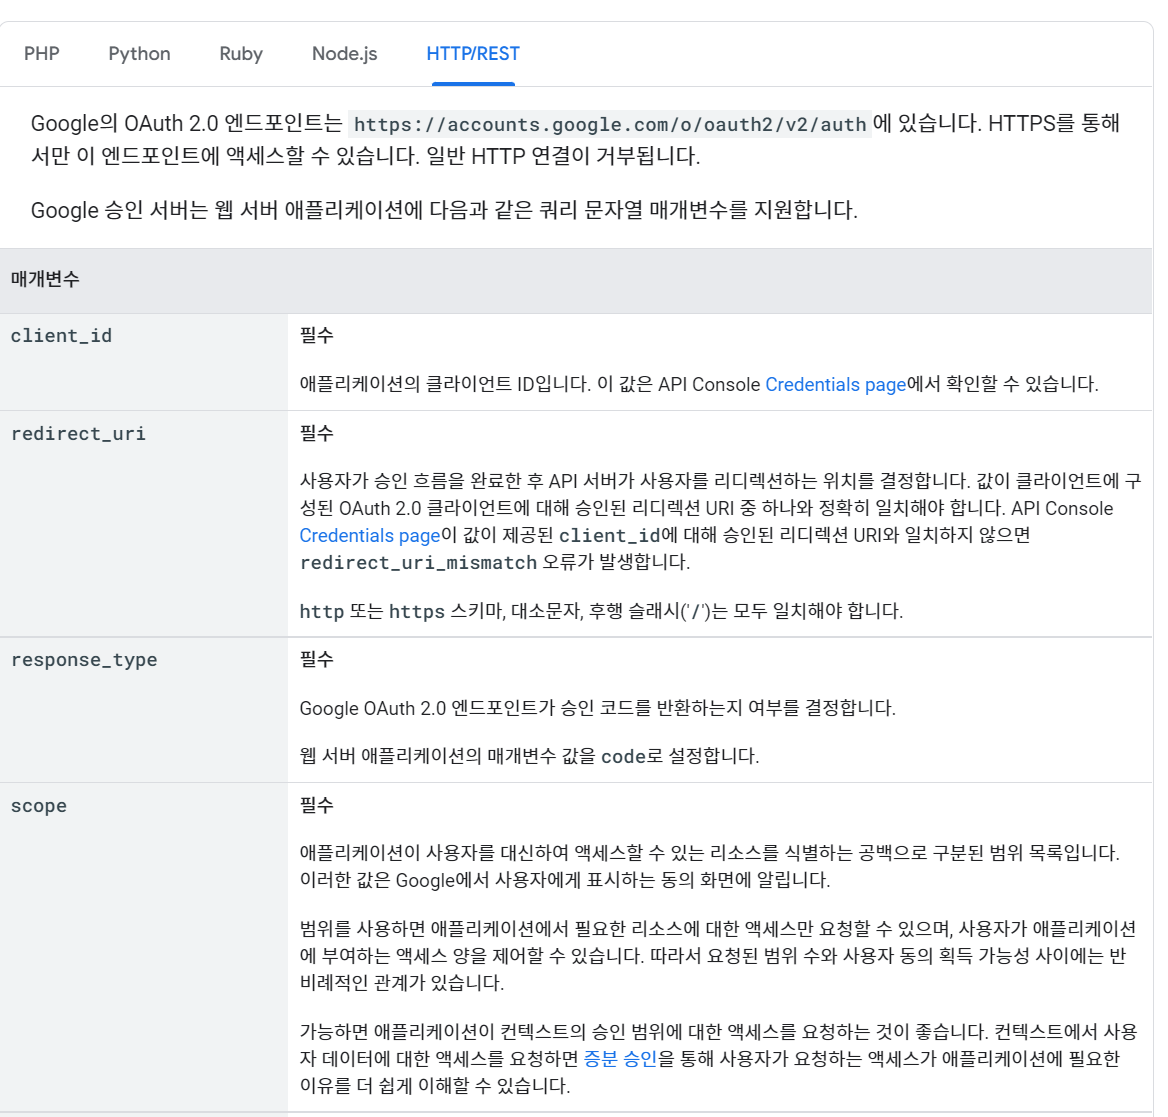
해당 URI로 사용자를 리디렉션 해줍니다.
https://accounts.google.com/o/oauth2/v2/auth
저희는 Yaml을 통해서 client_id, scope, redirect_uri를 설정했으므로 그것을 이용해주고, response_type 값만 "code"로 넣어줍니다.
저희는 리디렉션 할 URI을 만들어주는 것이므로 어떠한 URI을 만드는지 확인하고, 양식을 지켜줘야 합니다. Google API에 예시가 있으므로 참고해서 URI를 만듭니다.
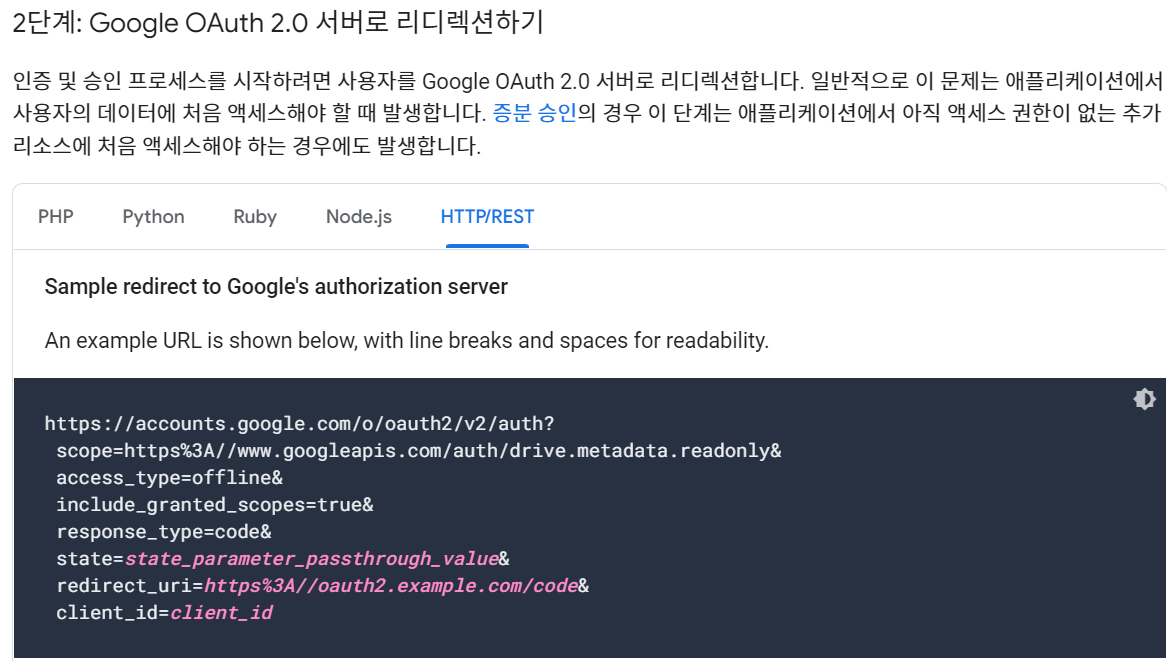
결론적으로 Google API URI + '?' + Key=Value & 형태로 구성돼 있습니다.
따라서 아래와 같이 코드를 작성할 수 있습니다. URI이 정상적으로 완성됐는지 로그를 찍도록 한 후, 여기까지 정상적으로 동작하는지 확인해줍니다.
@Override public String getOauthRedirectURL() { Map<String,Object> params = new HashMap<>(); params.put("scope",GOOGLE_DATA_ACCESS_SCOPE); params.put("response_type","code"); params.put("client_id",GOOGLE_SNS_CLIENT_ID); params.put("redirect_uri",GOOGLE_SNS_CALLBACK_URL); String parameterString=params.entrySet().stream() .map(x->x.getKey()+"="+x.getValue()) .collect(Collectors.joining("&")); String redirectURL=GOOGLE_SNS_LOGIN_URL+"?"+parameterString; log.info("redirect-URL={}", redirectURL); return redirectURL; }
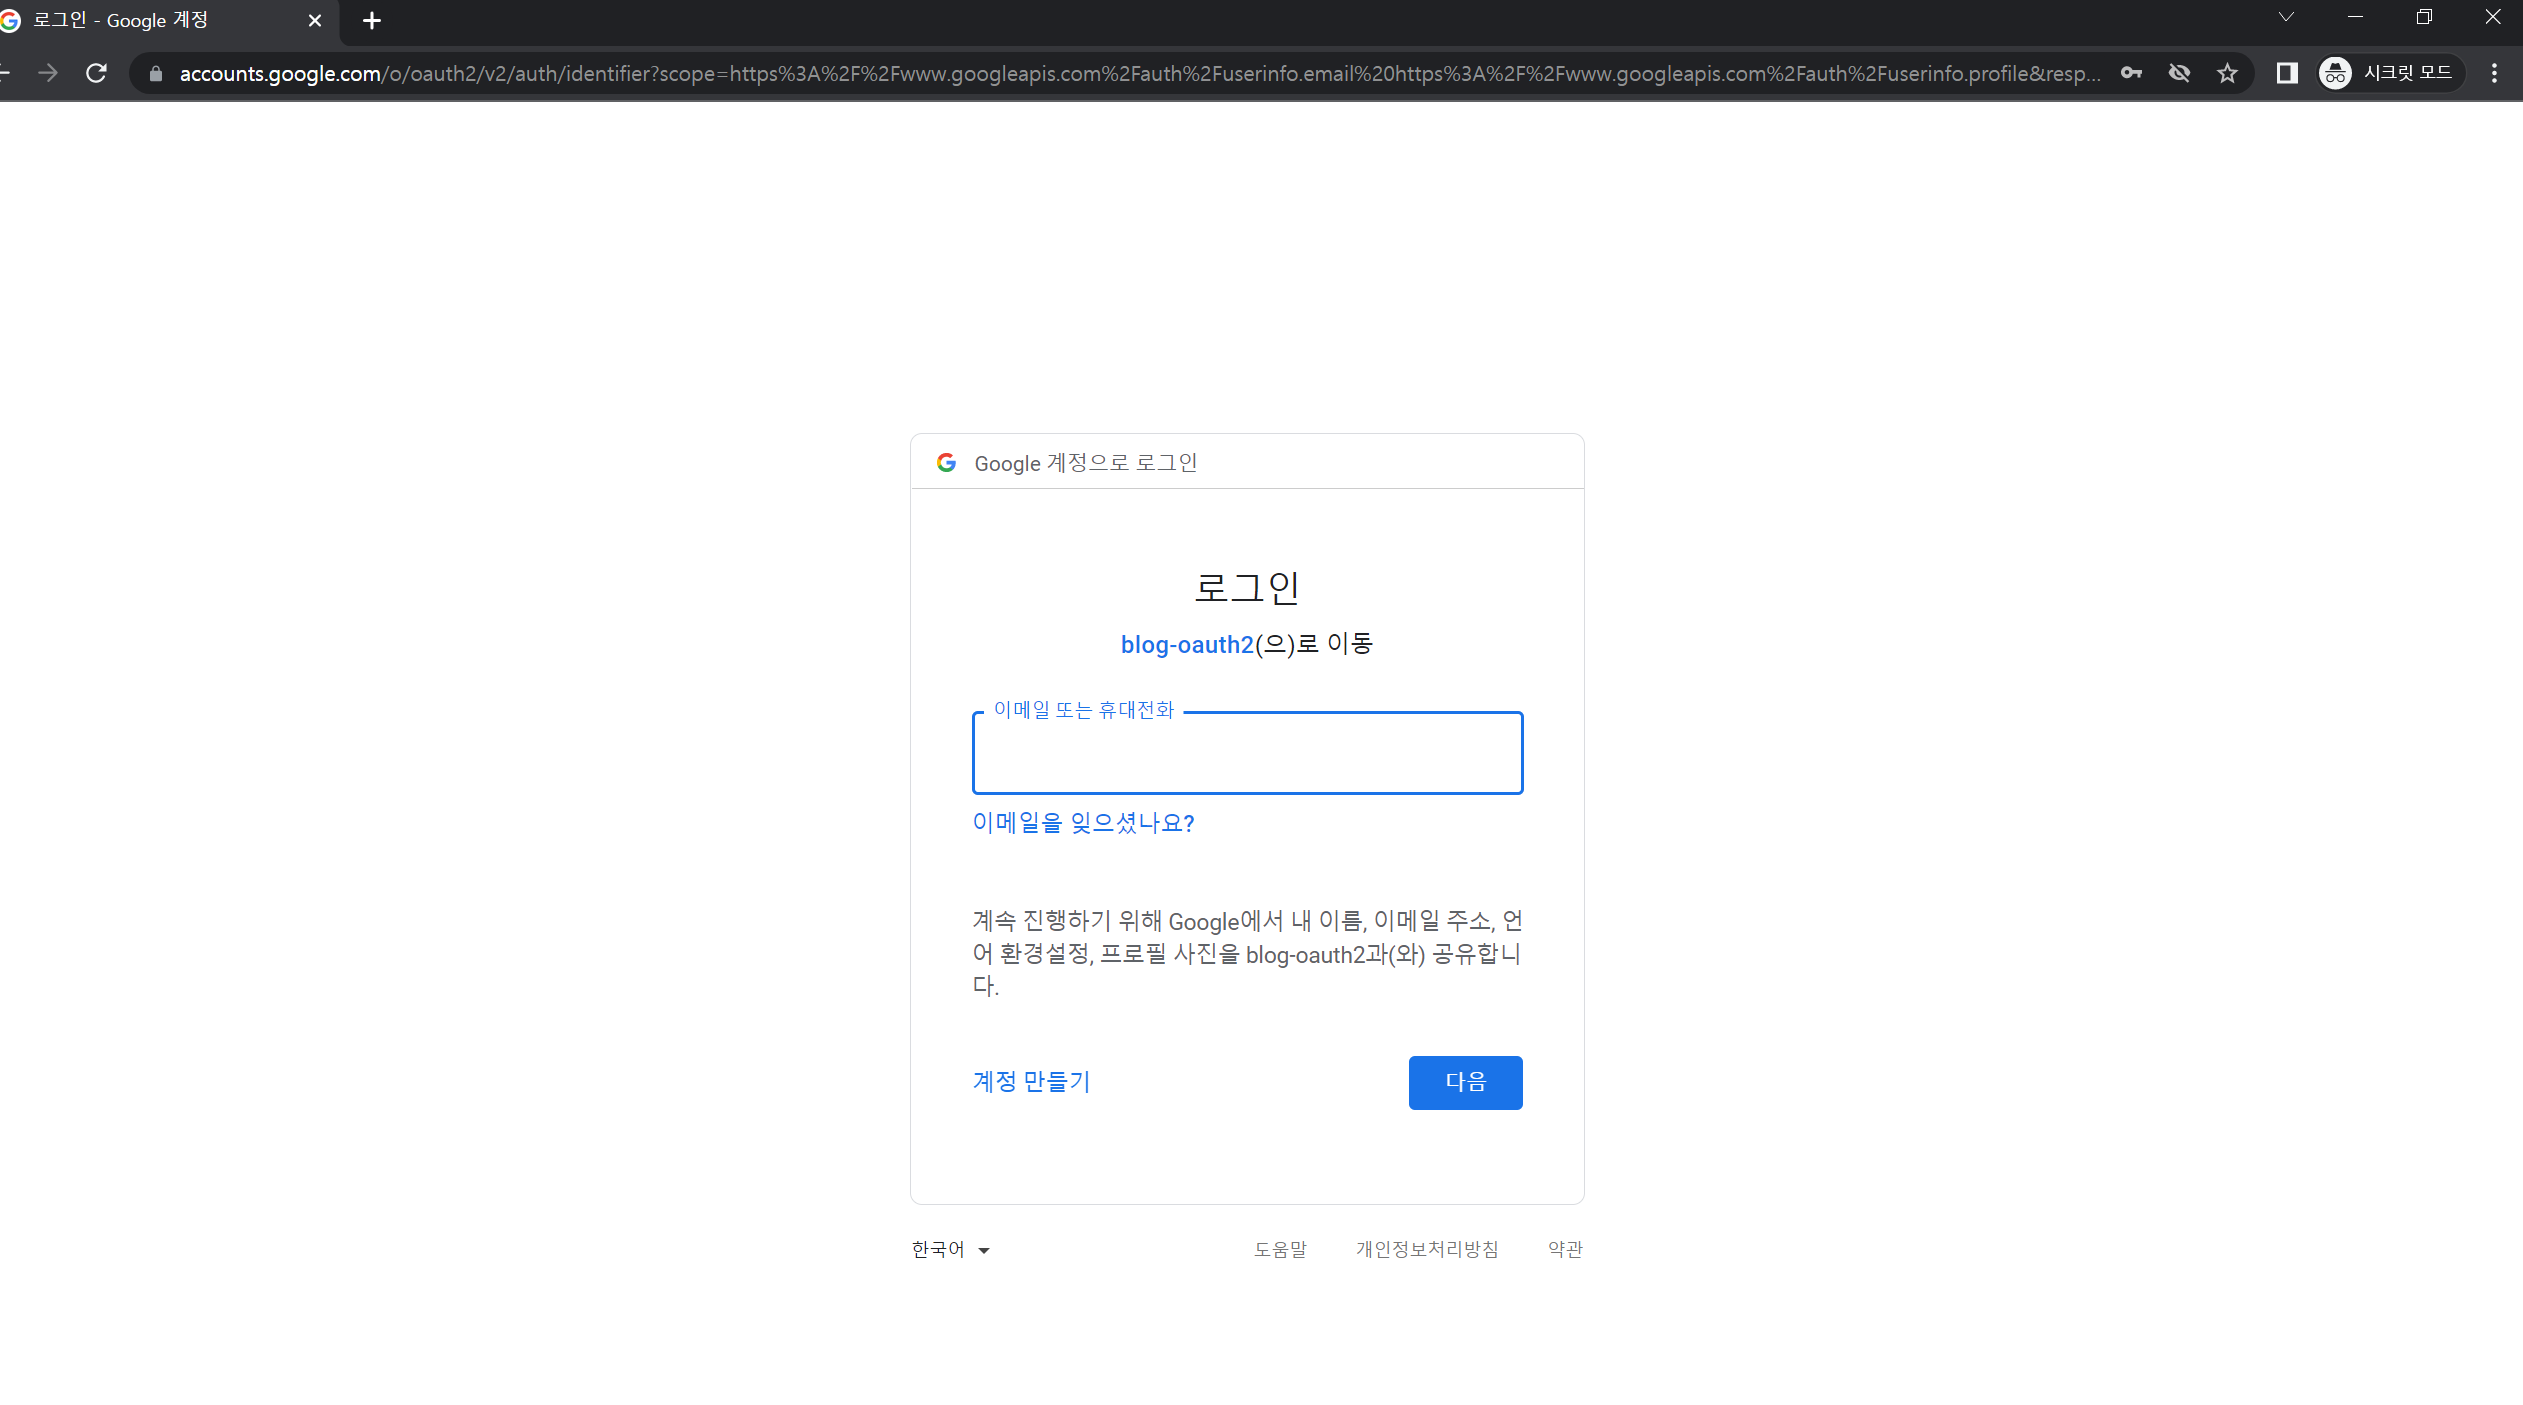
아래의 URI을 브라우저 주소창에 입력합니다.
localhost:8080/app/accounts/auth/google보시는 것과 같이 정상적으로 로그인 인증을 할 수 있도록 리디렉션을 해주고 있습니다. 하지만 인증이 끝난 후에 리디렉션에 대한 로직들은 만들지 않았으므로 로그인을 하지 않고, 다시 작성해보도록 하겠습니다.

7. OauthController - 2
이제 Googel Cloud Platform에서 설정한 리디렉션 URI가 동작합니다. 리디렉션 될 때 Google API가 제공하는 것을 보겠습니다.
http://localhost:8080/app/accounts/auth/google/redirect
아래의 URI은 구글이 설정한 리디렉션 URI입니다. 따라서 저희가 설정한 리디렉션 URI에? code= ~~~ 이 더해져서 오는 것을 알 수 있어야 합니다.

code를 이용해서 Access Token을 받아야 하므로 @RequestParam을 이용해서 code를 받습니다. 이때 이 코드는 한 번밖에 사용하지 못합니다.
@RestController @RequiredArgsConstructor @RequestMapping("/app/accounts") public class OauthController { private final OauthService oauthService; // 중략 @GetMapping("/auth/{type}/redirect") public ResponseEntity<?> callback(@PathVariable(name = "type") String type, @RequestParam(name = "code") String code) throws JsonProcessingException { GetSocialOAuthRes getSocialOauthRes =oauthService.oAuthLogin(code); return new ResponseEntity<>(getSocialOauthRes, HttpStatus.OK); } }
8. OauthService - 2
이제 code를 이용해서 Access Token을 발급받고, Access Token을 이용해서 설정한 Scope 즉 사용자의 정보를 받아야 합니다.
@Service @RequiredArgsConstructor public class OauthService { private final SocialOauth socialOauth; // 중략 public GetSocialOAuthRes oAuthLogin(String code) throws JsonProcessingException { ResponseEntity<String> accessToken =socialOauth.requestAccessToken(code); GoogleOAuthToken googleOAuthToken =socialOauth.getAccessToken(accessToken); ResponseEntity<String> userInfoResponse=socialOauth.requestUserInfo(googleOAuthToken); GoogleUser googleUser =socialOauth.getUserInfo(userInfoResponse); String user_id = googleUser.getEmail(); return new GetSocialOAuthRes("1234",1,"asdf", googleOAuthToken.getToken_type()); } }
9. SocialOauth - 2
9-1. requestAccessToken()
첫 번째로 호출하는 requestAccessToken(code)입니다. code를 활용해서 Access Token을 발급받습니다.
Access Token을 발급받기 위한 요청을 만드는 데 필요한 Google API를 보겠습니다.
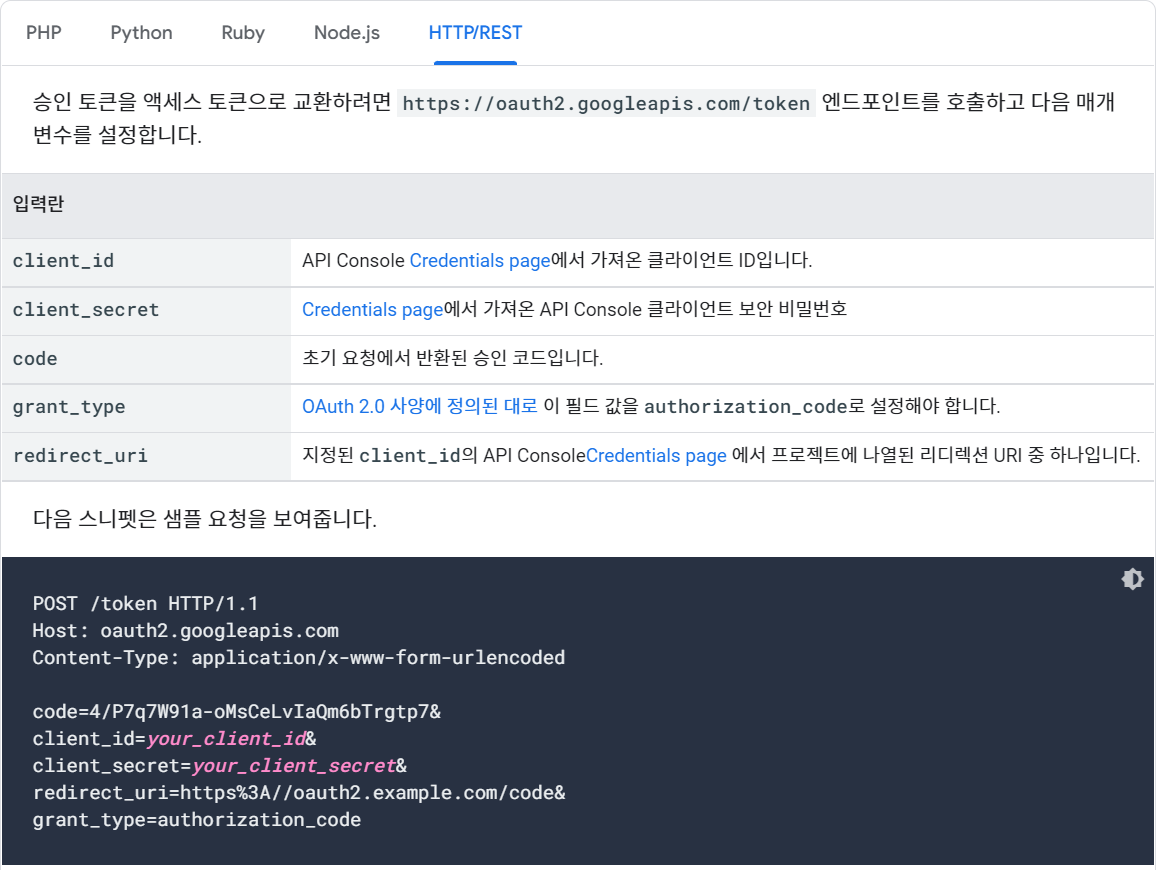
위의 요청과 비슷하게 client_id, client_secret, redirect_uri를 보내고, 다른 부분은 code와 grant_type입니다.
여기서 code는 로그인을 해서 발급받은 코드를 넣어주시면 되고, grant_type은 "authorization_code"로 고정돼 있습니다. 따라서 아래와 같이 작성해주시면 됩니다.
RestTemplate를 이용해서 엔드 포인트로 요청을 보낼 때 위에서 확인한 필수 사항을 body에 실어서 보냅니다.
@Component @RequiredArgsConstructor @Slf4j public class GoogleOauth implements SocialOauth{ private final ObjectMapper objectMapper; private final RestTemplate restTemplate; // 중략 @Override public ResponseEntity<String> requestAccessToken(String code) { String GOOGLE_TOKEN_REQUEST_URL = "https://oauth2.googleapis.com/token"; RestTemplate restTemplate=new RestTemplate(); Map<String, Object> params = new HashMap<>(); params.put("code", code); params.put("client_id", GOOGLE_SNS_CLIENT_ID); params.put("client_secret", GOOGLE_SNS_CLIENT_SECRET); params.put("redirect_uri", GOOGLE_SNS_CALLBACK_URL); params.put("grant_type", "authorization_code"); ResponseEntity<String> stringResponseEntity = restTemplate.postForEntity(GOOGLE_TOKEN_REQUEST_URL, params, String.class); return stringResponseEntity; } }
9-2 getAccessToken()
요청으로 받은 String 형태의 Access Token을 Object Mapper를 이용해서 객체로 변환합니다. 해당하는 필드 값을 알아보기 위해 Google API를 보겠습니다. 아래와 같이 구성돼 있는데 직접 해보니 refrest_token이 아닌 id_token이라는 필드 값으로 넘어옵니다. 유의해서 작성해주세요.
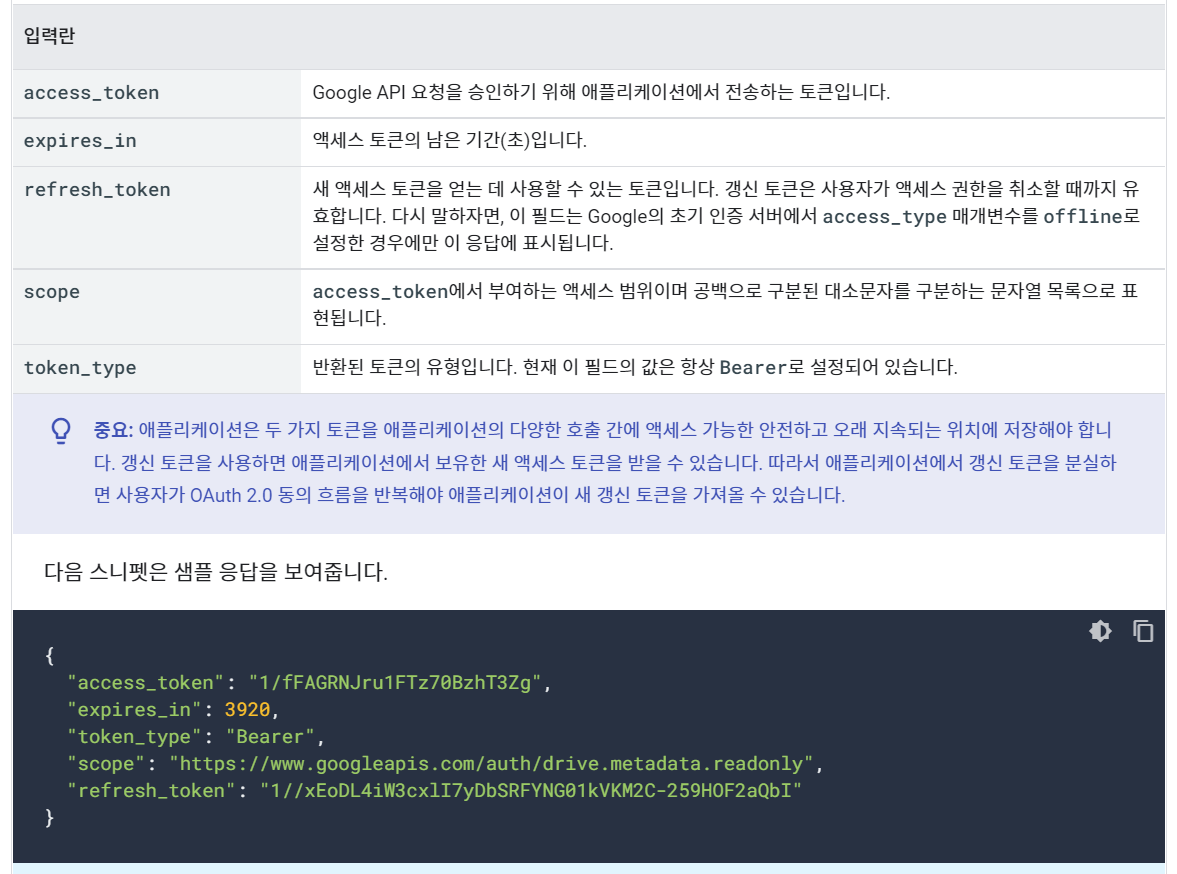
유형을 확인했으니 해당 토큰의 값들을 저장할 GoogleOauthToken 객체를 생성합니다.
@AllArgsConstructor @Data public class GoogleOAuthToken { private String access_token; private int expires_in; private String scope; private String token_type; private String id_token; }
객체에 Object Mapper를 이용해서 객체에 바인딩해줍니다.
@Component @RequiredArgsConstructor @Slf4j public class GoogleOauth implements SocialOauth{ // 중략 @Override public GoogleOAuthToken getAccessToken(ResponseEntity<String> accessToken) throws JsonProcessingException { log.info("accessTokenBody: {}",accessToken.getBody()); return objectMapper.readValue(accessToken.getBody(),GoogleOAuthToken.class); } // 중략 }
9-3 requestUserInfo()
이제 해당 토큰을 이용해서 사용자의 정보를 얻어와야 합니다. 요청을 보낼 URI은 아래와 같습니다.
https://www.googleapis.com/oauth2/v2/userinfo
해당 URI로 HttpHeader를 추가해서 보낸다면 user의 정보가 담긴 것을 반환받습니다.
이때 Header에는 Authorization(key): Bearer+ AccessToken을 추가하고 요청을 보내야 합니다.
@Component @RequiredArgsConstructor @Slf4j public class GoogleOauth implements SocialOauth{ // 중략 @Override public ResponseEntity<String> requestUserInfo(GoogleOAuthToken googleOAuthToken) { String GOOGLE_USERINFO_REQUEST_URL= "https://www.googleapis.com/oauth2/v2/userinfo"; HttpHeaders headers = new HttpHeaders(); HttpEntity<MultiValueMap<String,String>> request = new HttpEntity<>(headers); headers.add("Authorization","Bearer "+googleOAuthToken.getAccess_token()); ResponseEntity<String> exchange = restTemplate.exchange(GOOGLE_USERINFO_REQUEST_URL, HttpMethod.GET, request, String.class); System.out.println(exchange.getBody()); return exchange; } // 중략 }
9-4. getUserInfo()
위에서 반환받은 userInfo가 String 형태이므로 ObjectMapper를 이용해서 객체로 변환합니다. 이때 사용되는 객체는 아래와 같습니다.
@AllArgsConstructor @Getter @Setter public class GoogleUser { public String id; public String email; public Boolean verifiedEmail; public String name; public String givenName; public String familyName; public String picture; public String locale; }
@Component @RequiredArgsConstructor @Slf4j public class GoogleOauth implements SocialOauth{ // 중략 @Override public GoogleUser getUserInfo(ResponseEntity<String> userInfoResponse) throws JsonProcessingException { GoogleUser googleUser = objectMapper.readValue(userInfoResponse.getBody(), GoogleUser.class); return googleUser; } }
10. 후처리
여기까지 완성됐다면 Google API를 이용하는 것은 끝마쳤습니다. 이제 서버 쪽에서는 로그인한 user의 email을 통해서 처음 사용하는 유저라면 회원가입을 진행하고, 서버쪽에서 만든 JWT 토큰을 반환해주고, 기존에 존재하는 유저라면 바로 JWT 토큰을 반환해줍니다. 현재는 JWT 토큰 라이브러리를 추가하지 않았기 때문에 임의값을 반환하겠습니다. 이후에 Access Token과 JWT 토큰이 모두 만료되었다면, id_token을 이용해서 user정보를 가져와 JWT를 반환하는 과정을 다시 수행할 수 있습니다.
11. Test
처음 시작인 로그인을 진행하는 URI로 접속합니다.
http://localhost:8080/app/accounts/auth/google
로그인을 완료했다면 아래와 같이 JWT Token과 같은 정보를 서버 쪽에서 반환 받을 수 있습니다.

서버쪽 token, userinfo에 대한 body 내용을 콘솔에 출력한 것을 보겠습니다.
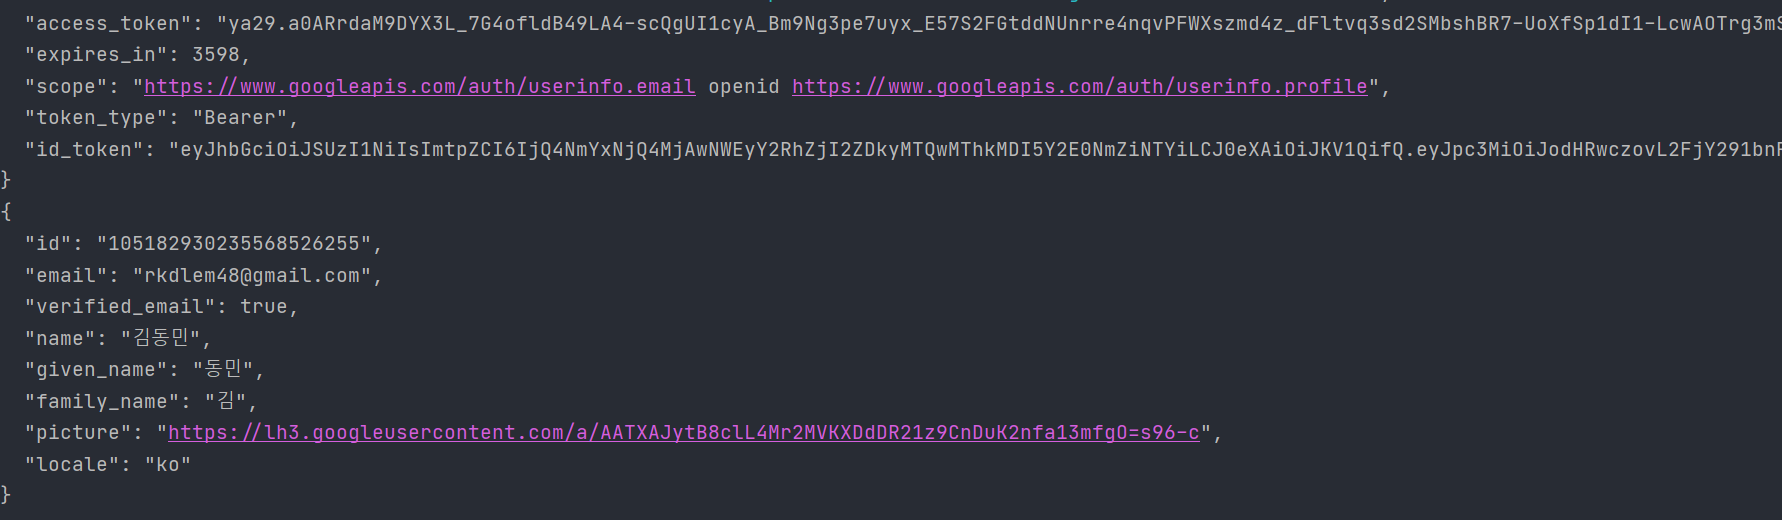
여기까지 해서 Session을 이용하는 것이 아닌 Google의 API들을 이용해서 code와 Token을 활용해서 사용자의 정보를 받는 것을 진행해봤습니다. 위에 순서도를 보시면 아시겠지만, 만약 프런트 엔드가 있다면 로그인을 프런트 쪽에서 담당하고, 리디렉션을 서버 쪽으로 하는 게 좋은 방법으로 보입니다.
모든 코드는 아래의 깃허브에서 확인 가능합니다.
https://github.com/rlaehdals/Oauth2Example
GitHub - rlaehdals/Oauth2Example
Contribute to rlaehdals/Oauth2Example development by creating an account on GitHub.
github.com
'SpringBoot > spring security' 카테고리의 다른 글
| Springboot[스프링부트] Spring Security Basic(5) 동작 과정 (0) | 2022.05.13 |
|---|---|
| Springboot [스프링부트] Spring Sercurity Basic(4) (0) | 2022.02.12 |
| SpringBoot [스프링부트] Spring Security Baisc (3) (0) | 2022.01.27 |
| SpringBoot [스프링부트] Spring Security Basic(2) (0) | 2022.01.27 |
| SpringBoot [스프링 부트] Spring Security Basic (1) 프로젝트 생성 (0) | 2022.01.25 |
댓글을 사용할 수 없습니다.